Mconf-Web with shibboleth for development
Instructions to enable shibboleth in development in Mconf-Web
Everything you need to know about Mconf.
Shibboleth is a solution that allows federated “single sign-in”. In brief, this is how it works:
You can read more about it here and here.
Most of the implementation of Shibboleth on Mconf-Web is done by using the Shibboleth module for Apache (mod_shib2). Once the Shibboleth module is installed and configured, when a user is redirected to the url /secure in your Mconf-Web server, Apache will redirect the user to the identity provider configured. After the authentication is done in the service and identity providers, the user is redirected back to Mconf-Web.
Mconf-Web will have access only to the information the identity provider returns. With this information a new account will be created automatically for the user. This happens only in the first access: in subsequent accesses the user will just access his account that was already created. On the first access the user has also the option to associate his federated account with an account on Mconf-Web, in case the user already had an account created on Mconf-Web.
The configuration of a Shibboleth service provider is usually different for different federations. Some steps are shared in all installations, but some others are unique and depend on how the federation is configured. In this page we will show a guide with all the steps we use to configure Mconf-Web for the Brazilian federation CAFe, that was used while the integration with Shibboleth was implemented in Mconf-Web. You can use it as a guide, but we strongly recommend also getting help from the people responsible for the federation you want to integrate Mconf-Web with and review every step while executing this guide.
This guide is strongly based on: http://wiki.rnp.br/pages/viewpage.action?pageId=41616305
Install Apache’s module for Shibboleth:
$ sudo apt-get install libapache2-mod-shib2
Enable it:
$ sudo a2enmod shib2
You need to configure your site in Apache to trigger the Shibboleth authentication when users access the path /secure. To do that, add the contents of the file config/webserver/apache2_shibboleth.example to the bottom of your /etc/apache2/sites-available/mconf-web-ssl, just before the closing </VirtualHost> tag.
Then configure how the Shibboleth module will communicate with the identity provider. This step will probably be different for other federations, this is just and example of what has to be configured.
Download these files (if they already exist, you will be replacing them):
$ sudo wget https://raw.github.com/mconf/mconf-web/v2.0.x/config/shibboleth/cafe/shibboleth2.xml -O /etc/shibboleth/shibboleth2.xml
$ sudo wget https://raw.github.com/mconf/mconf-web/v2.0.x/config/shibboleth/cafe/attribute-map.xml -O /etc/shibboleth/attribute-map.xml
$ sudo wget https://raw.github.com/mconf/mconf-web/v2.0.x/config/shibboleth/cafe/attribute-policy.xml -O /etc/shibboleth/attribute-policy.xml
Open /etc/shibboleth/shibboleth2.xml and replace:
$DOMAIN by you server’s domain, e.g. server.institution.com.Create a metadata file that will added in the metadata pool in your identity provider so that your application to be able to access it. The format of this file will probably be different for different federations.
To use our example metadata, first download it:
$ sudo wget https://raw.github.com/mconf/mconf-web/v2.0.x/config/shibboleth/cafe/metadata-sp.xml -O /root/metadata-sp.xml
There are several things to be edited in this file. It should be very straightforward, you just have to edit everything that starts with a $. Some examples for the values that should be added to this metadata file:
$DOMAIN: server.my-institution.com;$INSTITUTION: My Institution;$INSTITUTION_DOMAIN: my-institution.com.$SERVICE_NAME: My Web Conference Service.$SERVICE_DESCRIPTION: The best web conference server around.$ADMIN_NAME: John Doe.$ADMIN_EMAIL: john@my-institution.com.You can leave the $CERTIFICATE part as it is for now, we will fill it up soon.
You need a certificate to link to your Shibboleth installation. You can generate one with the command below. Replace $DOMAIN by your server’s domain (e.g. server.my-institution.com).
$ sudo shib-keygen -y 3 -h $DOMAIN -e https://$DOMAIN/shibboleth
This command will create two files: /etc/shibboleth/sp-key.pem and /etc/shibboleth/sp-cert.pem. If you used the configuration files above, these certificates files will already be referenced in the section CredentialResolver of /etc/shibboleth/shibboleth2.xml. Otherwise, change it to be like the example below:
<CredentialResolver type="File" key="sp-key.pem"
                    certificate="sp-cert.pem" keyName="$DOMAIN"/>
At last, edit /root/metadata-sp.xml once again and replace the block with $CERTIFICATE by the contents of /etc/shibboleth/sp-cert.pem. Make sure you do not include the first and last lines, the ones with -----BEGIN CERTIFICATE----- and -----END CERTIFICATE-----.
Having your server configured, you now have to enable and configure Shibboleth inside Mconf-Web.
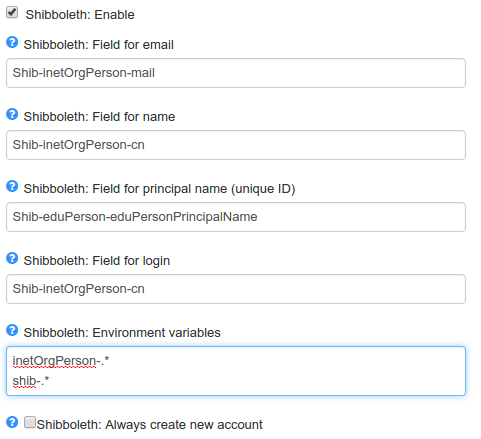
Go to the management area and you will see some parameters used to configure Shibboleth. They are:
shib- will be fetched.You can see in the picture below an example of how these fields can be configured:

Instructions to enable shibboleth in development in Mconf-Web
Description of the events triggered by the webhooks
A list of internal messages that go through redis on BigBlueButton
Este tutorial mostra como funciona o módulo de notas compartilhadas no Mconf
Este tutorial mostra as funções de moderação de usuários em uma conferência no Mconf.
Este tutorial inclui informações sobre como modificar o layout (disposição e visibilidade das janelas internas) de uma conferência no Mconf
Este tutorial mostra como funciona a integração do Mconf com o Moodle.
Este tutorial mostra como gravar e como visualizar conferências no Mconf
Este tutorial ensina como compartilhar documentos em uma conferência e como interagir com o quadro branco
Este tutorial mostra como utilizar o compartilhamento de tela Java em uma conferência no Mconf